

A working reference for surveyors, installers, main contractors and specifiers taking aluminium windows, doors and glazed screens from a measured opening to a signed-off installation in Dubai and the wider UAE. It sets out what LAA expects of a survey, how manufacturing sizes are derived, how our systems are fixed, glazed and sealed, and what has to be demonstrated at handover.
Download the PDF A4, print-ready — for the site file and the survey pack.
This guide is generic, your project is not. Where it conflicts with the system supplier’s technical manual, a structural engineer’s design, a consultant’s specification, or a current instrument of Dubai Municipality, Trakhees, DDA or Dubai Civil Defence, those documents take precedence. Regulatory thresholds quoted here were correct at the revision date above and must be re-checked against the edition in force on your project. Nothing here is a substitute for a competent person on site.
Standards and practice
LAA is the UAE division of Direct Trade Windows Ltd — UK company no. 04185385, incorporated 22 March 2001 — and this guidance is written to the British and European standards that practice is built on, adapted to Dubai conditions and to the authority having jurisdiction. Where a standard is named, the edition current at the time of the works governs.
- BS 6262Glazing for buildings
- BS 8000-7Workmanship on building sites — glazing
- BS EN 12600Impact classification of safety glass
- BS EN ISO 11600Sealant classification — class 20LM / 25LM
- BS EN 1670Corrosion resistance of building hardware
- BS 6375Performance of windows and doors
- BS 8213-1Design for safety in use and during cleaning
- PAS 24Enhanced security performance — held at the Slough plant
- Qualicoat / QualanodPowder coating and anodising quality, incl. Seaside class
- ASCE 7 / EurocodeWind loading, with the Dubai Wind Code and Dubai Building Code
- ISO 9001:2015Quality management — cert. no. UK-02-VS-02572
Naming a standard here states the basis this guidance is written to. It is not a claim that any particular product is certified to it — certification is stated on the product documentation for the specific system supplied.
The four stages
Every installation LAA supplies or executes passes through the same four stages. Work that skips a stage — most often the approvals stage, occasionally the commissioning stage — is where disputes, abortive manufacture and failed water tests come from.
- Survey — establish the client’s requirements, assess the opening, measure it, and derive manufacturing sizes.
- Approvals & preparation — secure the developer NOC and the authority permit, confirm the performance specification, and programme the works.
- Installation — remove the existing product, position, fix, glaze and seal the new one.
- Commissioning — test, adjust, inspect, demonstrate, document and hand over.
1. Site survey
Good surveying is the whole basis of a quality installation, and in the UAE it carries more weight than it does in a temperate market: heat, dust, salt air and the near-total absence of timber substrates all narrow the tolerance for a bad measurement. Surveyors should be trained in aluminium window and doorset installation technique and in the recommendations of the particular system being used — a Cortizo lift-and-slide, an Aluprof fire-rated screen and a unitised curtain wall do not survey the same way.
Establishing the client’s requirements
The surveyor should confirm with the purchaser, in writing:
- Configuration and handing — opening direction, handing of every leaf, the position of fixed and opening panels, and which way sliding leaves stack.
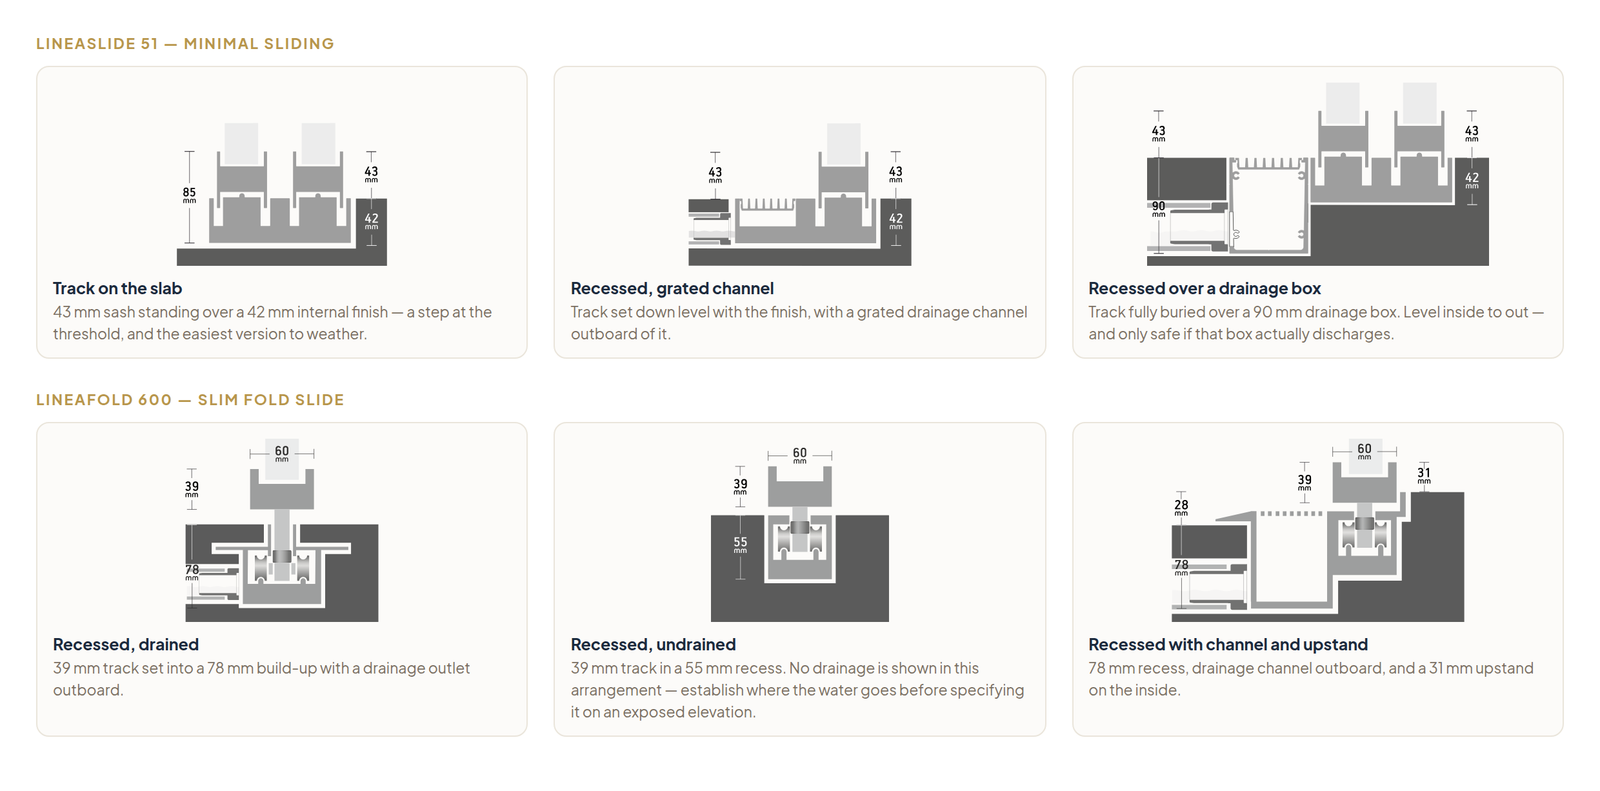
- Threshold type — flush, low-rise or weathered. Flush thresholds are heavily specified in Dubai villas for a level internal-to-terrace transition, and they are the single most common source of water ingress. If a flush threshold is required, the drainage strategy below it (channel drain, falls, waterproofing upstand) must be agreed and recorded at survey, not left to the installer.
- Hardware — handle range and finish, cylinder and keying (including master-key suites and whether the client wants keyed-alike sets), restrictors, closers, floor springs, electric strikes, access-control provision, magnetic contacts for the alarm, and motorisation.
- Finish — RAL or anodised reference, gloss level, whether internal and external faces differ (dual colour), and whether the finish must match existing joinery on site. Confirm any master-community colour restriction — several Dubai communities specify the permitted external frame colours.
- Glass specification — build-up, coating, toughened or laminated, acoustic interlayer, obscure or tinted, and any privacy or solar-control film already present that is to be replicated.
- Insect screens — fixed, hinged, roller or pleated, and on which side. These are commonly specified late and commonly clash with the reveal depth; capture them at survey.
Record the style of any product being replaced, the size of the opening lights and the positions of mullions and transoms, ideally with photographs, and have the record countersigned by the purchaser. On outward-opening doors and windows, advise the client on restriction devices — a door stop positioned as close to the opening stile as possible — because the onshore shamal arrives fast enough to tear an unrestrained leaf off its hinges. Note where an outward-opening leaf will project into a walkway, a pool surround or a parking bay.
The premium range, and what it asks of a survey
LAA leads with Altest’s minimal systems in Dubai. They buy a sightline, and they spend it on tolerance: the slimmer the section, the less material there is to fix through and the less an out-of-square opening can be absorbed. The numbers below are the ones that decide whether an opening is surveyable as drawn.
| System | Type | Max sash W × H | Max weight / sash | Sightline notes | Uw |
|---|---|---|---|---|---|
| SL520 | Minimal sliding | 3,000 × 4,000 mm | 600 kg | 42 mm frame height; 16–20 mm centre mullion | 1.3 |
| SL51 | Minimal sliding | 3,000 × 4,000 mm | 600 kg | 42 mm frame height; 20 mm centre mullion | 1.3 |
| FS47 | Slim fold slide | 1,300 × 3,500 mm | 130 kg | 60 mm sash; 92 mm centre mullion | ≥1.0 |
| PS47 | Slim pivot slide | 2,000 × 4,000 mm | 300 kg | 60 mm sash; 92 mm centre mullion | ≥1.0 |
| PD110 | Minimal slim pivot door | 2,000 × 5,000 mm | 300 kg | 40 × 60 mm frame; 36 × 60 mm sash | ≥1.0 |
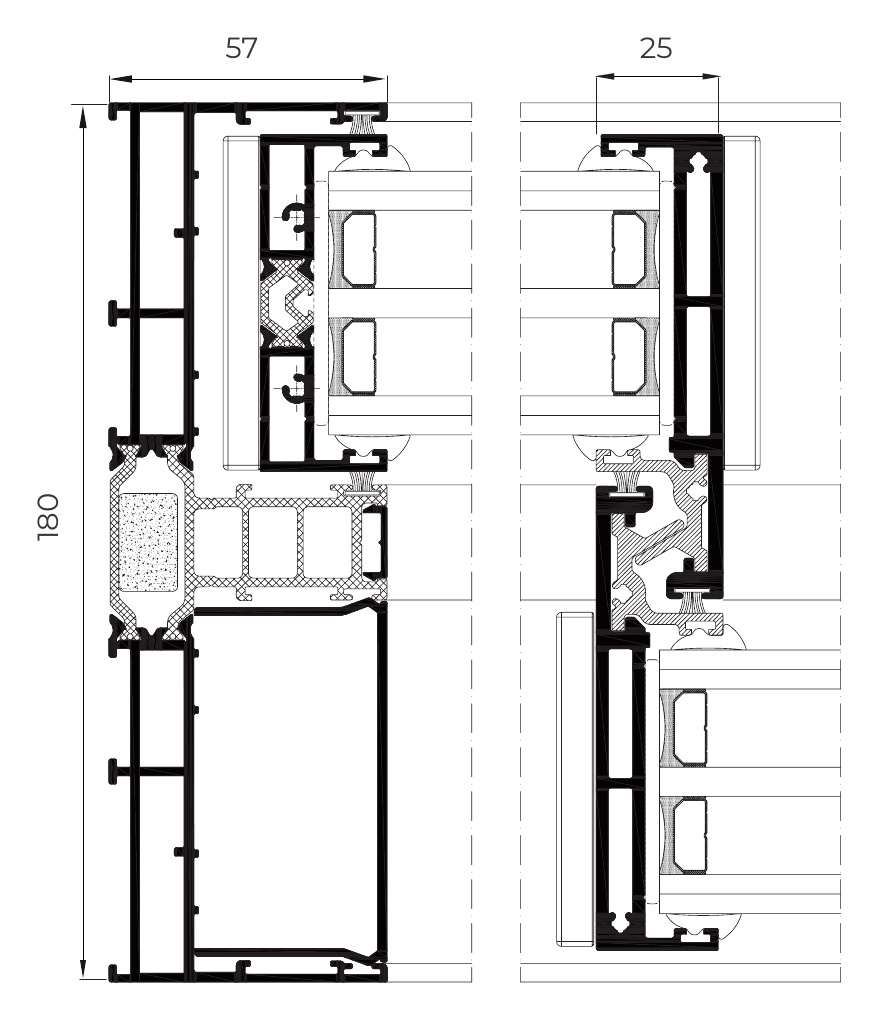
| HS97 | Minimal super-slim hinged casement | 1,400 × 5,000 mm | 300 kg | 25 × 60 mm frame; 27–36 × 60 mm sash | ≥0.9 |
Manufacturer’s published figures, for survey feasibility only — maximum weight and dimension interact, so confirm the combination against the typology before committing a size. Altest designate these by both a short code and a Linea name; confirm the designation on the order.
Three consequences for the survey. A 600 kg sash needs the structure under the track checked, not just the opening measured. A leaf at 4–5 m tall makes head deflection the governing check rather than width. And on a 20 mm centre mullion there is no sightline left to hide a discrepancy in, so squareness and plumb have to be recorded properly — see Figure 1.
Assessing the opening for suitability
Check for defects and deficiencies around the structural opening and notify the purchaser of anything found, reaching agreement on who rectifies it before manufacture begins. Typical Dubai substrate conditions and what to look for:
- Reinforced concrete frame with blockwork infill is the standard construction. Establish where the RC column, beam or slab edge actually sits behind the render, because that is where the load-bearing fixings need to land. A metal detector or cover meter is worth carrying.
- Hollow concrete block will not hold a conventional frame fixing at full capacity. Where jamb fixings must land in block, specify an anchor rated for hollow substrate, or a continuous sub-frame that transfers load to the RC frame.
- Cement render (plaster) thickness varies enormously and is frequently 20–40 mm. Fixings that are set only into render are not fixings. Measure the render depth by probing at several points, not one.
- Existing waterproofing and tanking at terraces, balconies, podiums and wet rooms. Establish the level of the waterproofing upstand relative to the proposed threshold and finished floor. Breaching a terrace membrane to fix a threshold is a guaranteed leak and, in a multi-storey building, someone else’s ceiling.
- Stone and marble sills, thresholds, reveals and cladding. Establish whether it is to be retained, lifted and re-bedded, or renewed, and who is responsible. Marble cracks when a threshold is fixed through it without a bedding compound.
- Corrosion evidence on existing frames, fixings and beads — heavy pitting or white bloom on a coastal site tells you what corrosion grade the new fixings need.
- Movement and cracking in the surrounding structure, especially diagonal cracking at opening corners.
On a large replacement contract, it is worth removing one unit early to see the true reveal condition, the render depth and the waterproofing detail before the rest of the order is released to manufacture.
Services in the opening
Note any electrical, mechanical or communications services in or adjacent to the opening — and in the UAE this list is longer than it is in Europe. Expect to find split-unit air-conditioning refrigerant lines and condensate drains, concealed FCU pipework, satellite and TV cabling, curtain and blind motor wiring, and irrigation lines below external sills.
Wherever possible, services should be routed around the outer frame, never through it. Where that is genuinely not possible, agree a solution with the purchaser that does not compromise the thermal, acoustic or weather performance of the product, and record it. Note the position of curtain and blind tracks, pelmets and motorised roller housings: these clash constantly with inward-opening and tilt-and-turn hardware, and the clash is far cheaper to resolve on a survey sheet than on site.
Measuring the opening
Take three measurements of width and three of height — at each end and at the centre — and establish squareness by taking both diagonals (Figure 1). The smallest width and the smallest height govern the manufacturing size. Record every figure, not just the governing one; the spread between them is what tells the workshop and the installer how much packing and making-good to expect.
- Measure to structure, and record the render and finish build-up separately. A surveyor who measures to the face of an unfinished plaster coat will produce a frame that cannot be fitted once the finish goes on.
- On new build, confirm whether the opening has been formed to the approved shop drawing and whether finished floor level (FFL) has been set. Measure from a datum, not from a screed that has not been laid.
- Check the opening for plumb, level and twist, not just squareness. A 3 m sliding door opening that is out of level will not run true no matter how well the frame is packed.
- For wide sliding and folding systems, check the deflection of the head — the structural opening head must not transfer slab or beam deflection into the frame. Where deflection head allowance is needed, it must come from the engineer, and the frame must be installed with a clear movement gap to suit.
- Photograph every opening with a reference board showing the opening number that appears on the survey sheet and the schedule.
Deriving manufacturing sizes
Manufacturing size is the smallest measured size less the agreed deductions. Deductions cover three things, and all three must be allowed for:
- Installation tolerance — the working clearance needed to get the frame into the opening, plumb it and pack it.
- Sealant joint width — a perimeter joint has to be wide enough for the sealant to work as a movement joint, and has practical limits at both ends. See Sealing below.
- Thermal movement — which in the UAE is not a rounding error.
The deduction is a function of the element length, so it cannot be a single fixed number across a schedule. As a working starting point for LAA-supplied systems, and always subject to the system manual and the specific joint design:
| Element length | Nominal perimeter joint each side | Total deduction from structural opening |
|---|---|---|
| Up to 1,500 mm | 8–10 mm | 16–20 mm |
| 1,500–3,000 mm | 10–12 mm | 20–24 mm |
| 3,000–6,000 mm | 12–15 mm | 24–30 mm |
| Over 6,000 mm | Joint width to be calculated from the movement analysis; an intermediate expansion joint in the assembly is normally required. | |
Add separately for the bedding of any sub-sill or threshold, and for any finish still to be applied to the reveal.
Why the thermal allowance matters here
Aluminium expands by roughly 0.023 mm per metre per °C (a coefficient of about 23 × 10−6/K for the 6060 and 6063 alloys used in facade extrusion). A dark powder-coated or bronze-anodised section in full Dubai sun runs far hotter than the shade temperature, and the annual swing between a January night and a July afternoon surface temperature is realistically 60–70 °C.
Applied to a 6 m coupled sliding screen, a 65 °C swing gives roughly 9 mm of length change. That movement has to go somewhere. If the frame is hard-packed into a rigid opening with a 6 mm mortar-tight joint, it will bow, the leaves will bind in summer, and the perimeter seal will fail in tension in winter. Dark finishes, long runs and south- and west-facing elevations all push in the same direction: more joint, not less.
Performance and special requirements
The surveyor is responsible for capturing the performance requirement, not merely the geometry. In the UAE the following should be established on every survey:
- Design wind load. The governing figure comes from the project structural engineer, calculated to the code accepted by the authority — commonly ASCE 7 or the Eurocode, with the Dubai Wind Code and the Dubai Building Code setting local parameters. Wind-tunnel-derived cladding pressures apply to tall and irregular buildings. Do not assume a system is suitable at height because it performed at villa level: corner and parapet zones carry far higher local suction than the general field of the facade.
- Thermal performance. Dubai’s green building framework — Al Sa’fat, alongside the Dubai Building Code — sets prescriptive limits on glazed elements under the elemental compliance route, in the region of U ≤ 2.1 W/m²K for windows and glazed doors and a low solar heat gain coefficient for the glazed facade, with tighter figures for skylights. Establish which route the project is using and which figure the consultant has committed to in the approved drawings. A performance-route project may permit a higher U-value on one element in exchange for compensation elsewhere — that is the consultant’s call to make, not the surveyor’s.
- Solar control and glare. Establish orientation and any external shading. West-facing glazing without shading is the hardest case on a Dubai villa and usually drives the glass specification more than the U-value does.
- Air and water tightness. Confirm the class required and the test regime, if any. On projects with a facade consultant, expect a site water test to be a contractual gate — see Commissioning.
- Dust and sand ingress. Specify drainage and gasket arrangements that tolerate fine airborne dust. Drainage slots that rely on a small unobstructed path will silt up; the maintenance regime handed to the client must say so.
- Corrosion exposure. Establish the distance to the coast and the presence of a pool, a salt-water lagoon or a chlorinated plant room. Palm Jumeirah, Jumeirah, Dubai Marina, the Creek frontages and the JBR strip are marine environments. This determines the fixing grade, the hardware grade and the coating specification — see Fixing.
- Acoustic requirement. Establish proximity to Sheikh Zayed Road, a flight path, or a plant deck, and whether a laminated acoustic interlayer or asymmetric build-up is required.
- Fire performance. Where the element forms part of a fire-rated compartment, an escape route, or a facade requiring a rated spandrel or cavity barrier, the specification is set by Dubai Civil Defence requirements and the approved fire strategy, and the product must be a tested and certified assembly — not a standard system with fire-rated glass substituted into it.
- Safety glazing. Confirm where laminated or toughened glass is mandatory: low-level glazing, doors and side panels, overhead and sloped glazing, glazed balustrades, pool surrounds and wet areas. Glazed balustrades and any glass forming a barrier must be laminated and designed for the imposed line load. Where a low cill creates a fall risk, guarding or a restrictor is required — establish the barrier height the consultant has approved.
- Structural glazing. Where the glass is structurally bonded or the assembly is structurally sealed, the design, the sealant and the bonding are a separate engineered discipline with their own approval trail. Flag it at survey; do not treat it as a glazing variation.
Structural loading
Where a load-bearing situation is suspected or confirmed, the system supplier’s recommendations must be followed and the engineer must sign the condition off.
- Support over the opening. Take reasonable steps to confirm that there is an RC beam, lintel or other means of supporting the structure above the opening, and that the existing product is not carrying load. Where it is, alternative support must be provided before removal — designed, not improvised.
- Coupled assemblies. Where units are coupled, the surveyor determines the coupling method, accounting for wind load, dead load, thermal movement, visual alignment and the position of the joint. Structural couplings follow the system supplier’s detail.
- Mullion deflection in door side panels. Where a doorset has side screens, mullion bounce may need to be limited by a reinforced or steel-stiffened mullion. Specify the stiffening explicitly.
- Large sliding and folding leaves. Confirm leaf weight against the gear rating and confirm that the supporting structure will take the point loads at the track and the hanging points.
- Balustrade and barrier loads. Any glazed element acting as a barrier is designed to the line load in the governing code; that is an engineering calculation, not a glass-thickness rule of thumb.
Risk assessment and records
A risk assessment for the suitability of the window or doorset design should be carried out by a competent person — commonly the surveyor — and a written record retained. Where the product is a domestic replacement, the designer is, in practice, the organisation taking the order. Consider safety in use and in cleaning: how a high-level or inaccessible unit will be cleaned, and whether the design forces an occupant to lean out of an opening light. In a market where external cleaning of villa glazing is routinely done from a ladder, the cleaning method should be discussed with the client and recorded.
Selecting the installation technique
Wherever possible, the survey should identify any necessary variation from standard technique — lug fixing, direct through-frame fixing, a continuous sub-frame, or a combination — and record it on the survey sheet so that the workshop can prepare the frames accordingly. Deciding this on site, with the frame already in the opening, is how the wrong fixing ends up in the wrong substrate.
2. Approvals and preparation in Dubai
This is the stage most often underestimated. Fenestration works in Dubai typically sit under two separate approvals, and one is a precondition of the other.
Who has jurisdiction
| Authority | Typically covers |
|---|---|
| Dubai Municipality | Building permits and modification permits across most of mainland Dubai. |
| Trakhees (Ports, Customs & Free Zone Corporation) | Palm Jumeirah, Jebel Ali, and other PCFC free-zone and Nakheel-master-developed areas — permits are issued by Trakhees rather than DM. |
| Dubai Development Authority (DDA) | TECOM and the DDA-administered free zones. |
| Dubai Civil Defence | Fire and life-safety provision — rated assemblies, escape routes, facade fire performance and any works affecting detection or suppression. |
| Master developer (Emaar, Nakheel, Meraas, Dubai Properties, DAMAC and others) | The community NOC — compliance with the community’s architectural rulebook, including external appearance, frame colour, glass tint and reflectivity, and any change to elevation. |
| Owners’ association / building management | Apartment and tower works — access, hoisting, working hours, protection of common areas, and contractor insurance. |
What to establish before manufacture
- Whether the works change the elevation. Like-for-like replacement in the same opening, same colour, same configuration is treated very differently from enlarging an opening, changing the frame colour, glazing in a balcony or adding a new opening. Anything that changes the external appearance will need the master developer’s NOC, and in most communities, so will a colour change on its own.
- Whether the opening is being altered structurally. Cutting into an RC element, enlarging an opening, or removing a section of blockwork spanning between columns needs an engineer’s design and an authority permit. Treat any proposal to widen an opening as a structural submission until an engineer says otherwise.
- That the developer NOC is issued before the authority permit is applied for, because the permit application normally requires it.
- Glass reflectivity limits. Several communities and the Dubai Building Code restrict external reflectivity to control glare onto neighbouring properties and highways. Confirm the permitted figure before the glass is ordered — reflective coatings are not a finish that can be changed after delivery.
- Whether a facade or fire consultant has to endorse the submission, and whether the system needs to be on an approved product list.
- Contractor registration. The installing contractor generally needs to be registered with the relevant authority and to hold current third-party and workmen’s insurance before a permit is issued. Confirm registration status early; it is a common cause of programme slip.
- Access, hoisting and craneage. For anything above ground floor, establish how the units reach the opening, what the building management permits, and whether a road or common-area closure permit is needed.
Do not release frames to manufacture against a specification that has not been approved. A powder-coated frame in a colour the community will not accept, or glass with a reflectivity above the permitted figure, is a total loss — it cannot be reworked.
Programming and protecting the product
Factory-finished aluminium should be programmed into the building process as late as is practical, to minimise the risk of damage from following trades, and it should be stored off the ground, under cover, and out of direct sun. On site, note two UAE-specific constraints:
- Protective film has a shelf life in this climate. UV and heat bake protective tape onto a powder-coated or anodised surface, and adhesive that has cooked on cannot be removed without damaging the finish. Remove protective film as soon as it has done its job, and never leave it on an installed unit through a summer. Follow the film manufacturer’s stated maximum exposure period.
- Dust and cement. Cement splashes, render slurry and grinding dust etch anodising and stain powder coating, and wind-blown sand will find any unprotected face. Protect installed units for the remainder of the wet trades, and clean any cementitious contamination off immediately with water — not with an acidic cleaner, which attacks the finish.
3. Removing the existing product
Before work starts, the installation team should have and understand all the relevant documentation — shop drawings, survey sheets, schedules, special instructions — and should check the sizes, types and condition of the delivered units against both the survey and the actual openings. The time to discover a size error is before the old window is on the floor.
Limiting damage
The installer is responsible for both internal and external protection of the property. Existing units should be removed with care and without permitting any movement of the structure above. In an occupied Dubai villa or apartment the practical points are:
- Protect marble and polished stone floors, which are the norm and which chip and scratch far more readily than the tile you might expect.
- Manage dust actively. An opening left unsealed for an hour in a sandstorm will distribute fine dust through an entire air-conditioned villa, and the dust will end up in the AC system. Screen off the work area, seal internal doorways, and coordinate with the client on shutting down or isolating the affected AC zone while the opening is open.
- Give the purchaser adequate notice to remove furniture, fittings, artwork and window treatments before work begins.
- Avoid debris in landscaped and irrigated areas — glass fragments and sealant offcuts in soft landscaping are a persistent complaint.
- Damage to the reveal is inevitable; keeping it to a reasonable minimum is not optional, and the extent of making-good should have been agreed at survey.
Closing the opening
Plan to install and seal the new unit on the same day the existing one is removed, for security, for weather protection and — specifically here — to keep dust, humidity and heat out of a conditioned building. Where that is not practicable, agree an alternative in advance with the purchaser: a temporary sealed closure, not a sheet of polythene taped to the render.
Safety of work
Removing and installing glazed units is a genuinely dangerous operation. All operatives must be trained in the safe use of every tool they touch, equipped with the correct PPE, and covered by current training and assessment records. The following apply:
- Heat. Under UAE federal rules, work in direct sunlight or in open areas must stop between 12:30 and 15:00 from 15 June to 15 September. Plan glazing lifts, external sealing and any roof or scaffold work around it — and treat the rule as a floor, not a target: heat stress is a real hazard well outside those dates and those hours. Provide shade, cool drinking water and rest, and watch for heat exhaustion in operatives handling glass in full sun.
- Glass handling. Eye protection, safety footwear, and cut-resistant hand and forearm protection whenever glass is handled. Use mechanical lifting for units beyond safe manual handling limits, and assess suction-cup lifting against the surface temperature — cups behave differently on glass that has been sitting in the sun.
- Power tools. On 220–240 V UAE site supply, use RCD protection rated at 30 mA maximum, particularly where moisture is present, or use battery tools. Inspect leads before use.
- Working at height. A safe working platform giving proper access to the opening is essential. Ladders are not a working platform. Where there is a risk of falling — including through the opening once the old unit is out — edge protection or fall arrest is required, and anchor points must be rated.
- Grinding and cutting discs. Heavy gloves, face visor and helmet; clear access; non-essential personnel moved well back; and sparks kept away from anything combustible, including dust sheets and the protective film on the new frames. Where hot works are carried out, a hot works permit from the building management is usually mandatory.
- Debris. Old frames, broken glass and sealant waste stored and disposed of safely, and removed from site rather than accumulated.
4. Installation
Units must be installed plumb, square and free of twist, racking and distortion, within the manufacturer’s tolerances, so that they operate correctly after installation and in accordance with the surveyor’s instructions. A frame that is fixed out of true will not be corrected later by adjusting the hardware.
Frame placement
Position the frame to minimise making-good, and take the following into account:
- Set the frame as far back into the reveal as is feasible. Recessing the frame improves weather performance and, in this climate, shades the frame and the glass edge — which reduces both the heat load and the thermal movement the perimeter joint has to absorb.
- Maintain the correct movement gap on every side, sized per the deduction table above. A frame wedged tight against structure has nowhere to expand.
- Respect the waterproofing. At terraces, balconies and wet areas, the frame and its fixings must not breach the waterproofing membrane or its upstand. Where the threshold must sit within a waterproofed zone, the detail — including the dressing of the membrane up behind the frame and the termination — is designed, not improvised.
- Clear the drainage. Confirm that the finished external level allows water to discharge from the frame drainage and away from the building, and that a subsequent screed, paving or planter will not bury the drainage slots. This is a frequent and expensive retrofit failure.
- On new build, the position within the reveal is set in the approved design; install to that design.
- 1RC slab
- 2Waterproofing membrane on the slab
- 3Upstand dressed up behind the frame and terminated above finished external level — never punctured below it
- 4Threshold bedded on continuous sealant
- 5Frame drainage discharging externally, clear of the building
- 6Channel drain taking surface water away from the threshold
 1
2
3
4
5
- 1Leaf bottom rail and glazing line
- 2Brush seal — the first weather line, and the first thing dust defeats
- 3Low-profile ramp giving the level transition
- 4Drainage chamber under the threshold — it must discharge externally
- 5Threshold bedded onto the structural substrate
Voids and unsound substrate
Voids found behind the render, or open cells in hollow blockwork at fixing positions, must be filled or bridged with a suitable solid or insulating material so that fixings gain real purchase. Extended fixing lugs may be needed to reach sound substrate. Do not rely on a fixing that has bottomed out in a void.
Fixing — centres and placement
Wherever practicable all four sides of the frame should be secured. LAA’s standard rules, subject to the system manual and the calculated wind load (Figure 5):
- Corner jamb fixings between 100 mm and 150 mm from the external corner.
- No fixing closer than 100 mm to the centre line of a mullion or transom.
- Intermediate fixings at centres no greater than 600 mm — and tighter where the design wind load requires it, which on exposed and high-level elevations it frequently does.
- A minimum of two fixings per jamb.
- On units over 1,800 mm wide, provide central head and sill fixings.
- Additional fixings adjacent to hinge, lock and keep positions where enhanced security is required, and at the track and hanging points of sliding and folding gear.
Each frame member must be fixed to the substrate, or to an adjacent unit, so as to resist wind load, operating loads, gravity, accidental impact and attempted forced entry. The surveyor specifies the nature, location and quantity of fixings, taking the manufacturer’s instructions into account; the installation company is responsible for confirming their suitability in the actual substrate encountered.
Fixing — method and corrosion grade
Two principal methods are used, separately or together: through-frame fixings and lug (cleat) fixings. Lugs suit a frame that must be set behind a rebate or where the frame face cannot be drilled; through-frame fixings suit direct fixing into a sound reveal. Practical requirements:
- Screws should penetrate at least 25 mm into a plugged hole in concrete, block or masonry, unless an equivalent provision is demonstrated by structural calculation.
- Connections to steelwork up to 2 mm thick use appropriate thread-cutting screws; over 2 mm, use pre-tapped holes with machine screws of at least 5 mm diameter, or power-driven hardened self-drilling screws.
- Corrosion grade is a specification item, not a stores decision. Fixings and hardware must be at least as corrosion-resistant as the grade required by the exposure. For coastal and marine sites — and most of Dubai’s prime residential stock is coastal — specify A4/316 austenitic stainless steel for fixings and exposed fasteners. Zinc-plated steel will bleed rust down a white render wall within a season.
- Avoid bimetallic contact. Aluminium in direct contact with untreated carbon steel, or with copper, will corrode galvanically in humid, salt-laden air. Isolate dissimilar metals with a suitable separator or use compatible grades throughout.
- Foam is not a fixing. Polyurethane foam can be a useful adjunct to mechanical fixings where a pre-cast or steel lintel makes the recommended fixing positions impracticable, but it must never be the sole means of fixing a frame into an opening.
Packers
Installation packers must be used adjacent to every fixing position to prevent frame distortion as the fixings are tightened. They must be resistant to compression, rot and corrosion, and must span the full depth of the outer frame. Tighten the fixings so that the frame bears securely on the packers — over-tightening distorts the section and is the usual cause of a frame that will not close squarely. Some lug details require the lug to be packed off the substrate to avoid pulling the frame out of line. Add packers adjacent to hinge and locking points where enhanced security is specified, and support the sill along its length where a heavy sliding track is carried.
- 1Structure — RC frame or concrete block
- 2External cement render
- 3Perimeter joint — neutral-cure 25LM silicone
- 4Closed-cell backer rod, two-sided adhesion
- 5Insulating fill behind the external seal
- 6Installation packer at every fixing position
- 7Through-frame fixing — A4/316 on coastal sites
- 8Aluminium outer frame with thermal break
- 9Insulating glass unit, coating on surface 2
- 10Internal seal or trim

Coupled assemblies
Coupled assemblies usually arrive as separate units to ease handling and limit damage. When building them up:
- Keep coupling joints equal, and frames aligned and plumb.
- Where a coupling joint is also an expansion joint — which, at the lengths common in Dubai villa glazing, it usually should be — place the seal within the joint during assembly: bedding mastic, expanding sealing tape or a flexible polymer gasket. External pointing sealant alone is not sufficient.
- Fasten couplings in accordance with the manufacturer’s instructions. Where the coupling is structural, follow the system supplier’s detail without deviation.
Finishing
Remove debris and contaminants and clear every drainage path before the unit is closed up. Make good internal reveals as agreed. Do not apply trims or sealant over loose material. Remove protective tapes as soon as practicable — see the note on UV above. Sand and cement should not be used to fill the gap between the outer frame and the substrate: it is rigid, it will crack, and it prevents the joint from moving. Where the new frame has a smaller front-to-back dimension than the original, the resulting line on the render should be removed as far as practicable or covered with a trim, with responsibility for the repair agreed in advance.
5. Glazing
Units may be delivered factory-glazed or supplied with glass and pre-formed gaskets for site glazing. In all cases the system manufacturer’s glazing instructions and the glass manufacturer’s instructions must be followed.
- Inspect every insulating glass unit before installation. Reject damaged units — an edge nip becomes a thermal-stress fracture in a Dubai summer. Do not install a unit with a damaged edge seal or a compromised spacer.
- Setting and location blocks must be positioned per the system manual. Blocks must be the correct material and hardness, must support the full thickness of the unit including both panes, and must not obstruct the drainage path.
- Drainage and pressure equalisation. Glazing rebates must drain. Never block a drainage slot with sealant, a setting block or debris.
- Coating orientation. Low-emissivity and solar-control coatings are position-sensitive. In a cooling-dominated climate the solar-control coating is normally on surface 2 — the inner face of the outer pane — to reject heat before it enters the cavity. Installing a unit reversed compromises the performance the project was approved on. Check the orientation marking on every unit before it goes in.
- Safety glass marking must remain visible after installation. This is a compliance requirement, not a preference; an inspector cannot verify a pane whose mark has been glazed out of sight.
- Handle toughened glass as a finished product. It cannot be cut, drilled or ground on site.
- Heat-soaked glass. Where toughened glass is used overhead, in balustrades or in large facade panes, heat-soak testing to reduce the risk of nickel-sulphide inclusion failure is commonly specified in this region. Confirm whether the specification requires it and that the certification accompanies the delivery.
6. Sealing
The perimeter sealant repels water and prevents air leakage while accommodating differential movement between the opening and the frame. In Dubai it also has to survive intense UV and a large annual temperature cycle without losing adhesion — which is why sealant selection here is not a like-for-like substitution from a temperate specification.
Sealant selection
- Sealants should be tested and classified to ISO 11600. Unless a specific requirement determines otherwise, use a low-modulus, high-elasticity sealant with a movement capability of at least 20% — marked 20LM or 25LM on the packaging. For the longer elements common in villa glazing, 25LM is the sensible default.
- Use a neutral-cure silicone against concrete, render, blockwork and stone. Acetoxy-cure silicone releases acetic acid as it cures, which attacks cementitious substrates and can corrode adjacent metals; it is the wrong product for a building perimeter joint regardless of what is on the van.
- Confirm the sealant is UV-stable and rated for the service temperature, and that it is compatible with both the frame finish and the substrate. Obtain the manufacturer’s compatibility and adhesion confirmation for the actual substrates — on a significant project, an adhesion test on site samples is worth the day it costs.
- Where the joint abuts natural stone or marble, use a non-staining formulation. Standard silicones can migrate plasticiser into porous stone and leave a permanent dark halo along the joint.
- Do not seal over or against bituminous membranes. Hydrocarbon migration from bitumen discolours silicone and degrades its performance.
Joint design and application
- Seal perimeter joints with a product appropriate to the frame surface, the substrate, the joint size and configuration, the anticipated movement and the exposure.
- Use a backing (Figure 11). Apply the sealant against a firm backing — a closed-cell, oversized circular foam backer rod — so it is forced against both joint faces. The sealant must not adhere to the backing, because three-sided adhesion prevents the joint from moving and is a standard cause of cohesive failure.
- Get the aspect ratio right. A perimeter joint sealant works in a shallow band, not a deep plug. Deep filling also prevents proper cure in sealants that rely on atmospheric moisture. Set the depth with the backer rod, and tool the joint to compact the sealant against both faces.
- Prepare the substrate. Joints must be clean, dry, sound and free of dust, laitance, curing compounds, old mastic and release agents. In this environment a joint that looks clean usually is not — fine dust is the most common adhesion failure on site. Prime where the sealant manufacturer requires it.
- Apply within the stated temperature and humidity window. Sealing a west elevation at 45 °C onto a substrate that is hotter still is outside most manufacturers’ conditions: the skin forms too fast, the joint is applied at maximum thermal expansion, and it will be in permanent tension for the rest of its life. Seal early in the day, or on the shaded elevation, and follow the sequence round the building.
- Insulate the perimeter. For aluminium-framed units, best practice is to insert or inject an insulating fill around the full perimeter behind the external seal, between the frame and the structural opening. This limits thermal bridging and reduces the risk of condensation on the frame in a heavily air-conditioned interior.
- Do not seal the drainage. Re-check that external sealing has not closed a drainage or pressure-equalisation path.
Trims and pressings
All trims must be compatible with the frame material and colour-matched where specified. External trims and pressings must be exterior-grade, UV-stable, and fixed with fixings of the same corrosion grade as the rest of the installation. Aluminium pressings and flashings should be finished to the same specification as the frames — a mill-finish pressing on a coated facade will chalk and streak.
7. Commissioning and handover
Testing and adjustment
- Operate every opening light and leaf through its full range, including locking, unlocking and any restrictor or egress release. Adjust hinges, gear and keeps so that compression on the gaskets is even across the leaf — not just tight at the lock point.
- Check the perimeter seal visually along its full length for gaps, voids, missed returns and adhesion failure, including at corners and at the threshold, where most failures start.
- Water test. Where the contract or the facade consultant requires it, carry out the specified site water test — typically a calibrated hose test to a recognised method — and record it. Where it does not, a controlled hose test on the first unit of each type is still the cheapest insurance available on a Dubai project, and is strongly recommended on any flush-threshold installation.
- Confirm drainage. Pour water into the glazing rebate and the frame drainage and confirm that it discharges externally, clear of the building.
Final inspection
Carry out a final inspection, preferably with the purchaser present, against the surveyor’s and manufacturer’s instructions. The checklist below is the minimum.
Final inspection checklist
- Every unit matches the approved schedule for size, configuration, handing, finish and glass specification.
- Frames are plumb, level, square and free of twist within tolerance.
- All fixings are present, at the specified centres, of the specified grade, and correctly tightened; packers are in place at every fixing.
- Perimeter joints are continuous, correctly backed, correctly tooled and fully adhered.
- All drainage paths are clear and discharge externally.
- Glazing is undamaged, correctly oriented, correctly blocked, and safety-glass markings are visible.
- All hardware operates smoothly, locks and unlocks, and is correctly adjusted; restrictors function and release.
- Insect screens fitted, operating and not fouling hardware.
- Protective film fully removed; finish undamaged, free of cement, sealant smears and scratches.
- Making-good complete to the agreed extent; site cleared of debris.
- Water test carried out and recorded, where specified.
- Handover pack issued and signed.
Demonstrating operation
The purchaser must be shown how every element operates — opening, locking, unlocking, and release of any safety restrictor for escape. Where practicable, have the occupants operate the units themselves during the demonstration; that is how you find out that a particular leaf is too heavy for a particular person, while there is still time to adjust it. Where the works are for a landlord, a developer or a managing agent, it is that party’s responsibility to pass the instructions on to the occupier. Provide information on ordering spare keys and cylinders.
The handover pack
LAA issues, and expects to receive from any installing contractor, the following at handover:
- As-installed schedule and drawings.
- System and hardware operating instructions.
- Glass specification and, where applicable, heat-soak and safety-glass certification.
- Finish specification — RAL or anodising reference — for future matching and touch-up.
- Cleaning and maintenance instructions, with the recommended frequency for this climate.
- Warranty documentation and its conditions.
- Test records, where testing was carried out.
- A signed final inspection sheet.
Maintenance the client must be told about
Warranty conditions in this region depend on maintenance actually being carried out, so this needs to be said clearly at handover rather than buried in a document:
- Clean more often than a European schedule would suggest. Airborne dust, construction fallout and — on coastal sites — salt deposition all attack a coated finish if left. Coastal and high-exposure sites need a materially shorter cleaning interval than inland ones.
- Use water and a pH-neutral detergent. Never use abrasive pads, solvents or acidic cleaners on powder-coated or anodised aluminium. Acidic facade cleaners used by general cleaning contractors are a common cause of permanent damage — warn the client explicitly.
- Keep drainage slots clear. Dust silts them up. They need checking and clearing periodically, and before the summer rain and the storm season.
- Lubricate and adjust hardware to the manufacturer’s schedule; sliding gear and rollers on heavily used doors need attention more often than the standard interval.
- Inspect perimeter seals annually and report any splitting, chalking or loss of adhesion before it becomes a leak.
Survey data sheet — the minimum record
Whatever format is used, a completed LAA survey record should carry all of the following. If a field cannot be completed on site, it should be recorded as outstanding and closed out before manufacture.
| Group | Recorded |
|---|---|
| Identification | Project, client, plot or unit reference, community, opening number, elevation, floor level, date, surveyor. |
| Dimensions | Three widths, three heights, both diagonals, reveal depths internal and external, render build-up, FFL datum, threshold and sill levels. |
| Substrate | Construction type, location of RC elements, block type, render depth, waterproofing position, stone finishes. |
| Product | System, configuration, handing, opening type, threshold type, frame finish, glass build-up, hardware schedule, screens. |
| Performance | Design wind load, U-value and SHGC commitment, acoustic requirement, fire rating, safety glazing positions, corrosion exposure. |
| Installation | Fixing method, fixing grade, packing, sub-frame or lug requirement, coupling and expansion joint positions, sealant type and joint width. |
| Constraints | Services in the opening, access and hoisting route, working hours, permits and NOCs required, protection requirements, agreed making-good. |
| Evidence | Photographs of every opening, existing product and defect, with the opening reference visible. |
| Sign-off | Surveyor signature and purchaser countersignature, with any noted exceptions. |
Need this applied to a live project?
LAA surveys, fabricates and installs aluminium glazing across Dubai and the UAE from our facility in Al Qusais Industrial Area 4, and fabricates on a white-label basis for other contractors. Send drawings, a schedule or a specification and we will come back with a quotation and a technical review of the detail.
London Architectural Aluminium L.L.C. · Al Qusais Industrial Area 4, Dubai, UAE · +971 4 295 9945 · info@laa.ae · A division of Direct Trade Windows Ltd · ISO 9001:2015, certificate no. UK-02-VS-02572